Sunday, August 18, 2013

FlywayFile, a maven plugin for generating migration script version number for flywayDB

I thought I do not need DB migration tool as long as I am good at handling version control and I use OR mapping in the java world. But, after using Ruby DB migration tool for a while in a Big Data project, I feel it will make use peaceful mind if we use an agile DB migration tool. In Ruby, we have nice db migration tool from active record migrations. I use it and it is pretty handy in an agile environment. In the java world, we have agile DB migration tools too. What I find recently is FlywayDB. It looks neat and well documented. Also, I like its feature comparison on its homepage.

But, it seems like FlywayDB does not have a tool for generate a migration files fitting its name convention for migration files. This post is about introducing my quick work that creatign a maven plugin to help user generate script file name having proper version info as prefix.

The code has be shared on Github. It named as FlywayFile as I am thinking it could be expanded to handle file operation stuff for FlywayDB in the future. Actually, I will ask if FlywayDB will accept this as one of their Maven plugin.

There are two eclipse maven projects in the repository. One the the main part, which is about maven plugin. The second is an extremely simple servlet, which can generate version number based on system time and random number.

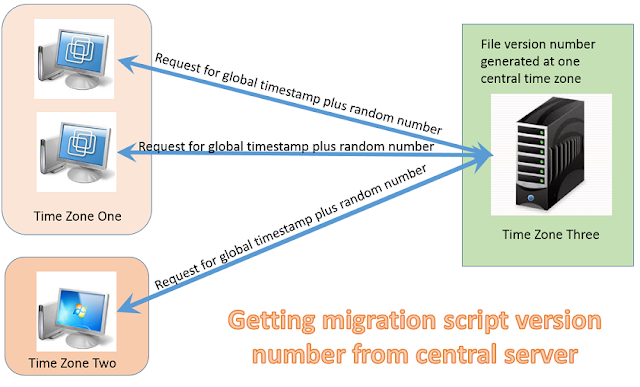
The reason for me to add this servlet here is that I think there might be case where we have developer from different time zone. But they share one version control system like subversion or git. So, in order to avoid confusion, we can use a central server to generate the migration script file name. However, this version code does not support complicate network environment yet. It is just for a prototype. I can improve it later if working in different time zones is really popular case. Below is a picture that can interprets this idea quickly.

To use this maven plugin, we need to do the following steps
  1. Installing this maven plugin into your local maven repository as I have not registered it with central maven plugin repository
  2. Adding "org.idatamining" plugin group into your project pom.xml file or global settings.xml file
  3. Adding property "flyway.SQL.directory" in your project pom.xml. This property specifies where the SQL migration script file will be created.
  4. Adding property "flyway.filename.generator" in your project pom.xml. This property is optional. It specifies the URL, where VersionNumber servlet listens.
  5. call the generate goal: mvn flywayFile:generate -DmyFilename=jia
Below is a sample pom.xml file I used to test this maven plugin. The property "flyway.filename.generator" is optional. We need to set its value only when we need to get version number from a central server.

  4.0.0
  org.idatamining
  testFly
  jar
  1.0-SNAPSHOT
  testFly
  http://maven.apache.org
  
      /home/yiyujia/workingDir/eclipseWorkspace/testFly
      http://localhost:8080/versionGenerator/VersionNumber


      junit
      junit
      3.8.1
      test


mvn package mvn install:install-file -Dfile=./flyway-version-maven-plugin-1.0.jar -DgroupId=com.nokia.flyway -DartifactId=flyway-version-maven-plugin -Dversion=1.0 -Dpackaging=jar mvn flyway-version:flyway-version mvn com.nokia.flyway:flyway-version:1.0:create -e -DuniqueVersion=false -DmyFile=testFile mvn archetype:generate -DgroupId=idatamining.org -DartifactId=maven-flyway-generator-plugin -DarchetypeGroupId=org.apache.maven.archetypes -DarchetypeArtifactId=maven-archetype-mojo mvn -o flywayGenerator:create -DmyFile=yiyuFun -e -X mvn archetype:generate -DgroupId=org.idatamining -DartifactId=testFly -DarchetypeArtifactId=maven-archetype-quickstart -DinteractiveMode=false mvn -o flywayGenerator:create -DmyFilename="yiyuFunny" -e -X mvn -o flywayGenerator:create -DmyFilename="yiyuFunny" -Dprefix=A mvn archetype:generate -DgroupId=org.idatamining -DartifactId=versionGenerator -Dversion=1.0 -DarchetypeArtifactId=maven-archetype-webapp -DinteractiveMode=false

Saturday, August 17, 2013

create an EC2 instance with additional storage (EBS)

  1. Create EBS volume.
  2. Attach EBS volume to /dev/sdf (EC2's external name for this particular device number).
  3. Format file system /dev/xvdf (Ubuntu's internal name for this particular device number):
    sudo mkfs.ext4 /dev/xvdf
  4. Mount file system (with update to /etc/fstab so it stays mounted on reboot):
    sudo mkdir -m 000 /vol
    echo "/dev/xvdf /vol auto noatime 0 0" | sudo tee -a /etc/fstab
    sudo mount /vol
    
Here is AWS relevant doc.
groups visudo uncomment grant privilidge to wheel group ln -s /source/dir ./softlinkName ssh-keygen 1) I will send you an private key file in separate email. Say, its name is damodar.pem. you download and run “chmod 600 damodar.pem” 2) Ssh into ec2 instance: “ssh -i ./damodar.pem damodar@ec2-54-216-247-239.eu-west-1.compute.amazonaws.com “ 3) After you login, you will see a soft link called workingDir under your home directory. It linked to folder /vol/damodarSandbox. /vol is mount with an EBS volume, which gives you larger storage size. You can run df command to check it. 4) Your account damodar is in sudoer list. So, you can run sudo command. 5) To connect to redshift, you can run command “ psql -h ddw-stats.cjbo3ahdtzbo.eu-west-1.redshift.amazonaws.com -p 5439 -U YourDBname -d ddwstore” wget --no-cookies --no-check-certificate --header "Cookie: gpw_e24=http%3A%2F%2Fwww.oracle.com" "http://download.oracle.com/otn-pub/java/jdk/7u45-b18/jdk-7u45-linux-x64.tar.gz"

Wednesday, August 14, 2013

setup Mahout environment


svn co http://svn.apache.org/repos/asf/mahout/trunk
svn co http://svn.apache.org/repos/asf/mahout/branches/mahout-0.8

mv trunk/ mahoutTrunk/

wget http://apache.mesi.com.ar/mahout/0.8/mahout-distribution-0.8.tar.gz

ln -s /home/yiyujia/workingDir/mahoutTrunk mahout

vi .bash_profile
source .bash_profile

export HADOOP_HOME=/home/yiyujia/workingDir/hadoop-1.1.1
export HADOOP_CONF_DIR=$HADOOP_HOME/conf
export MAHOUT_HOME=/mahout
export PATH=$PATH:$MAHOUT_HOME


$HADOOP_HOME/bin/hadoop fs -mkdir testdata

$HADOOP_HOME/bin/hadoop fs -put synthetic_control.data testdata

mvn dependency::tree

$MAHOUT_HOME/bin/mahout org.apache.mahout.clustering.syntheticcontrol.canopy.Job
$MAHOUT_HOME/bin/mahout org.apache.mahout.clustering.syntheticcontrol.kmeans.Job

$HADOOP_HOME/bin/hadoop fs -get output $MAHOUT_HOME/examples

$MAHOUT_HOME/bin/mahout clusterdump --input output/clusters-10 --pointsDir output/clusteredPoints --output $MAHOUT_HOME/examples/output/clusteranalyze.txt

http://harish11g.blogspot.com/2012/02/configuring-mahout-clustering-hadoop.html https://cwiki.apache.org/confluence/display/MAHOUT/Recommender+Documentation http://chimpler.wordpress.com/2013/02/20/playing-with-the-mahout-recommendation-engine-on-a-hadoop-cluster/ http://stackoverflow.com/questions/9072223/how-to-add-maven-dependencies-for-mahout-and-hadoop

Monday, August 5, 2013

install hive


wget http://mirrors.gigenet.com/apache/hive/stable/hive-0.8.1-bin.tar.gz

tar -xvf hive-0.8.1-bin.tar.gz 

ln -s /hadoop/hive-0.8.1-bin /hive


.bash_profile

#set HADOOP_HOME env
export HADOOP_HOME=/hadoop/hadoop

#set HIVE_HOME env
export HIVE_HOME=/hive

PATH=$PATH:$HOME/bin:$HADOOP_HOME/bin:$HIVE_HOME/bin
 
export PATH


yum grouplist | grep -i mysql
yum groupinfo "MySQL Database server"
yum groupinstall "MySQL Database server"


service mysqld start chkconfig mysqld on && service mysqld restart && chkconfig --list | grep mysqld mysql -uroot -p create database hive; create user 'hive'@'%' identified by '123456'; GRANT ALL PRIVILEGES ON hive.* TO 'hive'@'%' WITH GRANT OPTION; /etc/my.cf system-configure-firewall open 3066 hive-site.xml hive.metastore.local true controls whether to connect to remove metastore server or open a new metastore server in Hive Client JVM javax.jdo.option.ConnectionURL jdbc:mysql://yiyuCent1.corp.ybusa.net:3306/hive?createDatabaseIfNotExist=true JDBC connect string for a JDBC metastore javax.jdo.option.ConnectionDriverName com.mysql.jdbc.Driver Driver class name for a JDBC metastore javax.jdo.option.ConnectionUserName hive username to use against metastore database javax.jdo.option.ConnectionPassword 123456 password to use against metastore database
http://blog.milford.io/2010/06/installing-apache-hive-with-a-mysql-metastore-in-centos/

Thursday, August 1, 2013

setup linux VM in Azure cloud


  1. log into Microsoft Azure control port https://manage.windowsazure.com/
  2. click the New button as shown in the picture. 

  3. Input necessary info into fields as shown in the picture.  To lauch CentOS VM,I use OpenLogic CentoOS 7 image.  
  4. Click side bar Virtual Machine icon. And, click Dashboard. You can find the DNS name at the place where red arrow pointing at. 

  5. Using SSH client to login created VM:  ssh UserName@DNSName.cloudapp.net
  6. Using command to reset root account password:   a) sudo -s    b) passwd 
  7. If ssh key is not uploaded when the VM is created and you want to have passphraseless login, please refer to another blog post "configure passphraseless SSH login among CentOS servers" (no keychain installation needed).