Thursday, October 25, 2018

setup AzureML dev environment and deploy machine learning model into AKS


Azure Container Service (ACS) is  now Azure Kubernetes Service (AKS)Applications in ACS can be migrated into AKS. MS document is scattered here and there and applied to different version of services. Below is a collection of documents that help to deploy a python machine learning model into AKS as micro service. Below is collection of tutorials. By following them, we can successfully deploy a machine learning model into AKS as web service. 

  1. Configure a development environment 
  2. training a model . if run into package missing error, install them in conda env. For example, conda install matplotlib
  3. following this tutorial to deploy model into AKS
  4. following this tutorial to consume an Azure Machine Learning Web service 
  5. following this tutorial to troubleshooting image/service building error. 


Comments:
  1.  AZML service API does not check the conflict of the image/service name? It looks like Azure just silently created image/service with same name different version number. 
  2. There is no sophisticated authentication and authorization configuration. In class azureml.core.webservice.AksWebservice.deploy_configuration, we can see it has primary key and secondary key parameter. But, it is not enough to fit real life life projects.  Probably, it is because those services are always supposed to be deployed as micro service in a private sub-net? Something like OAuth 2.0 should be implemented and allow user to configure authentication and authorization in Azure portal.
  3. ... more

Wednesday, October 17, 2018

Prevent joomla tinyMCE editor from not displaying image when copy paste content from other website.


I have a knowledge base site built with joomla. Recently, I found images does not shown when we copy&paste web page content from other sites.

This happens because original web pages put crossorigin="anonymous" in their tags. So, as long as joomla tinyMCE filters out this img attributes, those images will be shown again.

To solve this, a quick walk around is finding an tinyMCE plugin and register it in joomla. this plugin will filter out crossorigin attribute when content is pasted into tinyMCE textarea. As a quick dirty solution, I use tinyMCE paste plugin found in plugins directory. And modified two places as below.


java script

Open file:
/var/www/html/media/editors/tinymce/plugins/paste/plugin.min.js


Add below content marked as red,

function insertClipboardContent(clipboardContent, isKeyBoardPaste, plainTextMode, internal) {
        var content, isPlainTextHtml;
        if (hasContentType(clipboardContent, 'text/html')) {
          content = clipboardContent['text/html'];
        } else {
          content = pasteBin.getHtml();
          internal = internal ? internal : InternalHtml.isMarked(content);
          if (pasteBin.isDefaultContent(content)) {
            plainTextMode = true;
          }
        }
        content = Utils.trimHtml(content);
        //should use Dom parser for robust coding. 
        content = content.replace(/crossorigin=\"anonymous\"/gi,'');


chown apache:apache plugin.min.js


sudo chmod 644 plugin.min.js


PHP

Open below file,
/var/www/html/plugins/editors/tinymce/tinymce.php

Add below content marked as red,

// Drag and drop Images
        $allowImgPaste = false;
        $dragdrop      = $levelParams->get('drag_drop', 1);

        $externalPlugins['jpaste'] = JUri::root() . 'media/editors/tinymce/plugins/paste/plugin.min.js'; 


 $externalPlugins = array(
                array('jdragdrop' => JUri::root() . 'media/editors/tinymce/js/plugins/dragdrop/plugin.min.js'),
                array('jpaste' => JUri::root() . 'media/editors/tinymce/plugins/paste/plugin.min.js'),
            );


Above is just a quick dirty walk around. Creating a dedicate tinyMCE plugin for filtering should be a better neat solution.


Friday, June 1, 2018

three inquisitive kids to building a website and be youTuber

Some kids education resources.

  • Math Olympiad grade 4/5 finding 5 digits number problem solution https://www.youtube.com/watch?v=gYAAwk3YZAs
  • 2019 4 grade math Olympiad Dec 1c https://www.youtube.com/watch?v=wN0EXNM786o&t=12s
  • 3rd Grade - Simplifying Fractions https://www.youtube.com/watch?v=9N9UF6VDh6M
  • Order of operations grade 4 https://www.youtube.com/watch?v=p78rAOvenNA
  • dart throws score problem. Math Olympiad 1998 grade 4/5 https://www.youtube.com/watch?v=aXMAO9pX6L4

Thursday, March 22, 2018

Access Jupyter notebooks on Azure DSVM

Data Science VM, or DSVM is a serials VM offers from Microsoft Azure Cloud platform. It comes installed with a comprehensive tools for data science projects. In addition, it also by default includes several iPython notebooks as sample scenarios for users to jump start. How to access and run experiments in them? It can be tricky for beginners. In this blog, we answer this question specifically for Linux Ubuntu DSVM, or Linux DLVM (Deep Learning version, NC series).

When logging in your VM, you can see two directories "Desktop" and "notebooks". All the sample notebooks stay in the "notebooks" directory. When we access Jupyter notebooks, we are actually access the notebooks on Jupyter server. We can access Jupyter server by typing https://[vm_ip]:[port_no] in a browser tab.

In DSVMs, there is a default port 8000 already configured and the Jupyter server is automatically launched when the DSVM is provisioned. The user can access the "notebooks" directory by using address https://[vm_ip]:8000 and run all the notebooks under this directory right away.
Sometimes, you need to manually start the Jupyter server for other reasons (e.g. your notebooks are stored in a different directory). You need to perform following steps.

  1. Navigate to your home directory to locate file jupyter_notbook_config.py file (see screeshot below). If the file does not exisit, execute "jupyter notebook --generate-config" in console.  
  2. Add c.NotebookApp.notebook_dir = ‘/home/mylogin/’ to make Jupyter server point to it when started (see screenshot below). You can use a different directory path as well.  
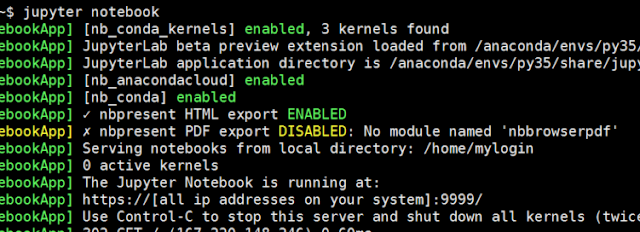
  3. Execute "jupyter notebook password" and set the password in console. 4. Execute "jupyter notebook" in console to start the Jupyter server. When the server is launched, the output will look similar to below screenshot. Locate the port number, which is usually 9999 as shown below.
     
  4.  Go to the overview page of your VM in Azure portal to add in-bound rule for port 9999 (It can be another port if you have other configurations). 
  5.  Now you can access the above set directory at https://[vm_ip]:9999